Arshiya Syeda
I wish! I wish! I wish my hair were rid of its frizz! This was my prayer every morning when I was getting ready for school. If your hair is a nest of frizz and waves like mine, you will totally understand what I’m talking about.
If only I knew then that there is a whole treasure trove of hairstyles out there that are specifically suited for frizzy wavy hair, my life would have been so much easier. So, to help you escape the agony of properly styling your frizzy, wavy hair, I have compiled a list of 50 hairstyles that would work perfectly for you.
50 Fantastic Hairstyles For Frizzy Wavy Hair
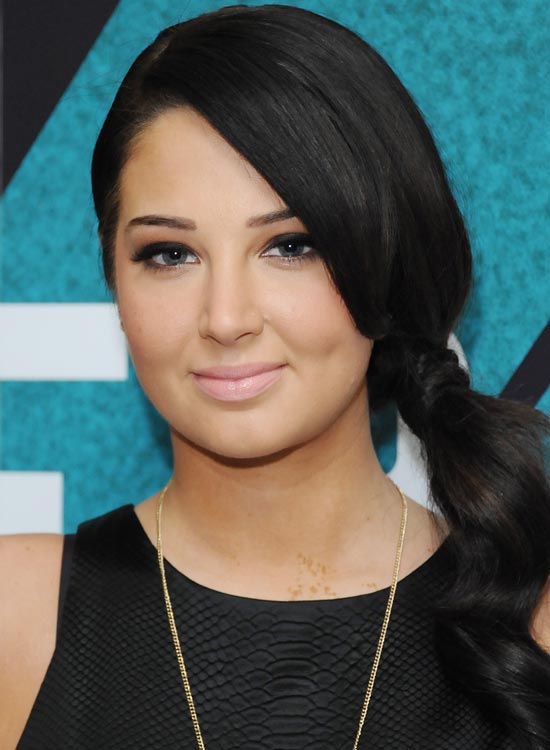
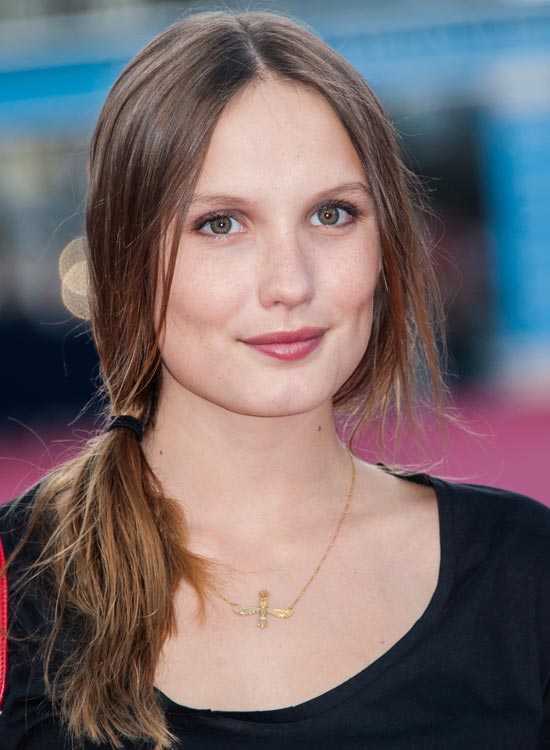
- Side Ponytail
- Messy High Ponytail
- Ombre Side Ponytail
- Pouf Ponytail
- Messy Side Fishtail Braid
- Dutch Braided Bun
- Side Ponytail
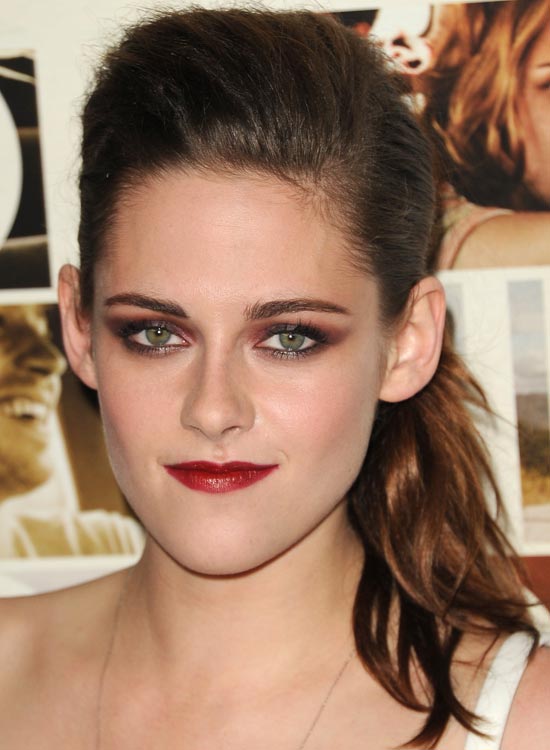
- Messy Ponytail
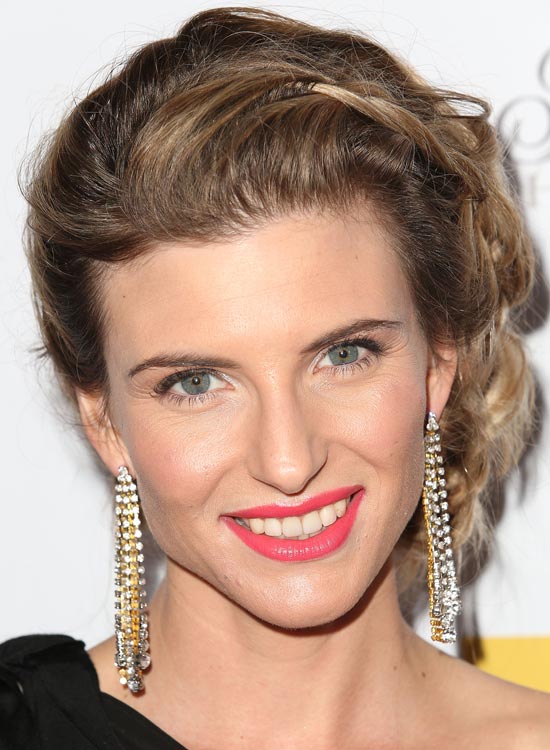
- Twisted Intricate
- 4-Strand Side Braid
- Crimped Side Bun
- Puffy Braid
- Side Thick Braid
- Side Short Lean Fish Braid
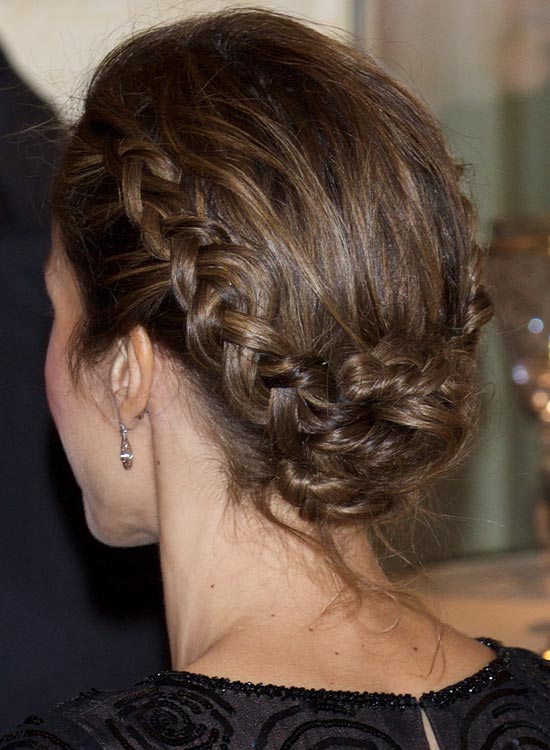
- Braided Chignon
- Wavy Long Platinum Hairdo
- Golden Spiral Curls
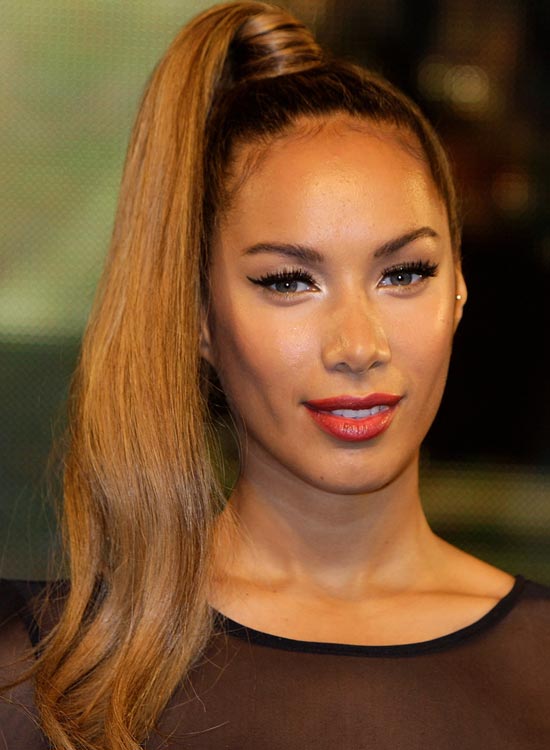
- The High Ponytail
- The Sleek Side Ponytail
- The Messy Half Up
- Messy Side Braid
- Tousled Banged Braid
- Ponytail Braid
- Messy Half Fusion
- Thick Ponytail Braid
- Messy Braided Bun
- The Messy Side Ponytail
- Messy Half Done Chignon
- Messy Sleek Fishtail
- Medium Ponytail
- Mini Side Braids
- Inverted French Braid Bun
- Messy Wavy Braid
- Long Messy Brown Braid
- Ombre Headband Braid
- The Thin Braid
- Tousled Braid
- Interwoven Crown Braid
- Chunky Short Side Braid
- Chunky Mixed Braid
- Braided In
- Braided Loose Tresses
- Golden Lean Braid
- Side Braid With Medium Tresses
- Messy Frizzy Plaits
- Lean Mini Braid
- Side Braid In Wavy Elegance
- Tender Loose
- Braid Ribboned
- Elegant Half Up
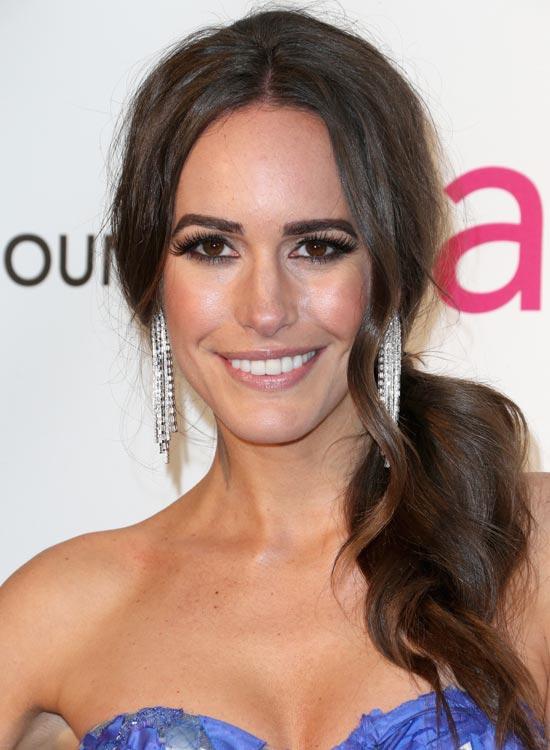
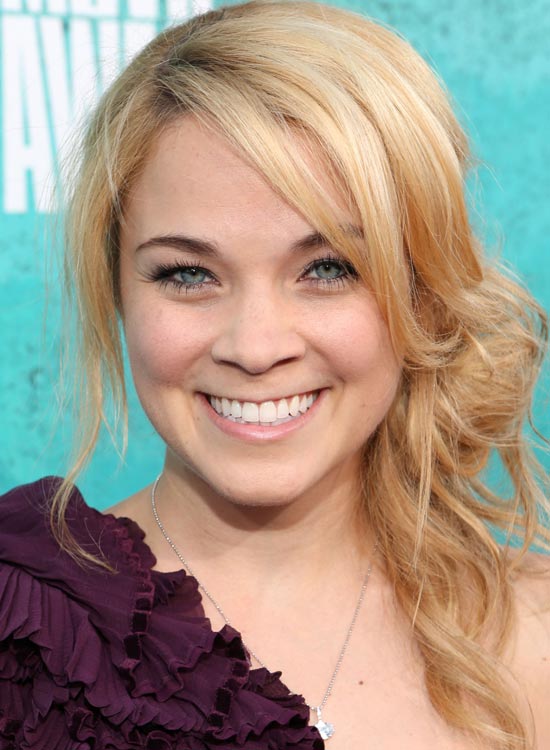
1. Side Ponytail
Have to go out for a fancy dinner and only have 10 minutes to spend on your hair and makeup? Girl, I gotchu! This hairstyle is going to be a lifesaver for you. It is proof that even a simple side ponytail can look classy.
What You Need
- Texturizing spray
- Hair elastic
- 1-inch curling iron
How To Style
- Spray on some texturizing spray on washed, dried hair.
- Part your hair down the middle.
- Gather your hair into a low ponytail on one side.
- You can finish off by pulling a tendril of hair out of your ponytail and curling it to frame your face.
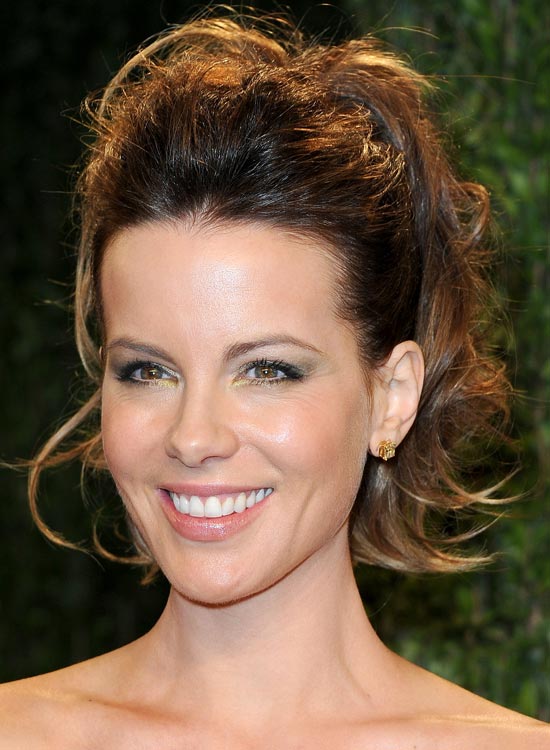
2. Messy High Ponytail
Kate Beckinsale sure knows what she is doing with her hair (even if she doesn’t know what she’s doing with her film career.! This look shows us how an ordinary high ponytail can be sported for a formal occasion with the help of the right hair products and the perfect makeup.
What You Need
- Texturizing spray
- Volumizing mousse
- Paddle brush
- Thick hair elastic
How To Style
- Put on some texturizing spray and volumizing mousse in your hair after you have washed and partially dried it.
- Brush all your hair back and tie it into a slightly loose, high ponytail.
- Now, divide your ponytail into two parts and grab one part in each hand.
- Pull the two parts of the ponytail outwards so that the hair elastic pushes up and tightens your ponytail. This will add a slightly voluminous pouf on top of your head.
- Puff up the ponytail a bit more with your hands to finish the look.
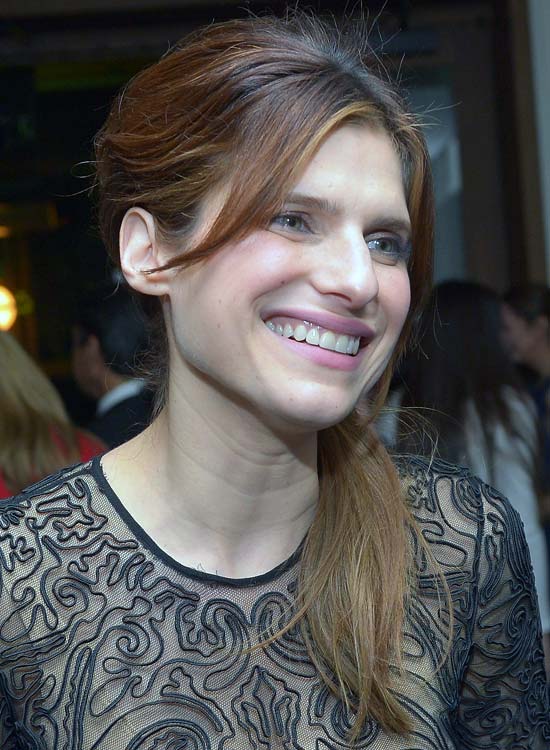
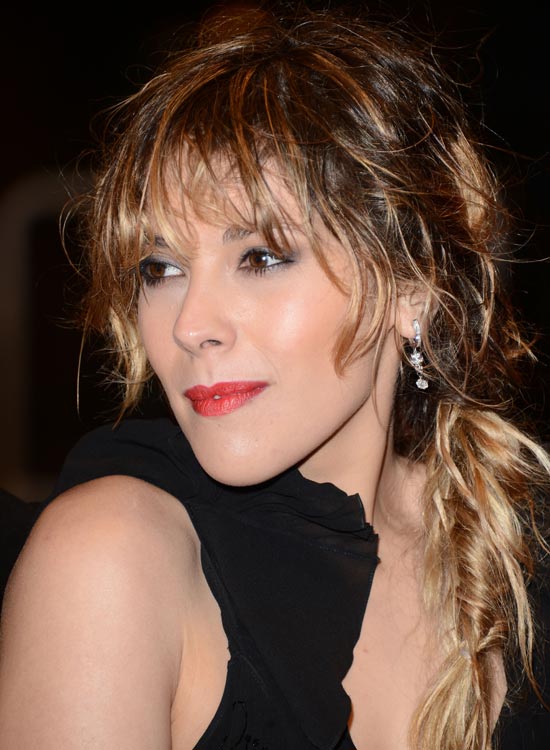
3. Ombre Side Ponytail
Do you want to look like a classy intellectual who does not bother herself with dressing up too much? Then go for this look. This side ponytail is dressed up in a ruffled chaotic avatar. The subtle bouffant gives it ample detail.
What You Need
- Texturizing spray
- Hair elastic
How To Style
- Get your hair cut in some long bangs and colored in ombre shades.
- Â Part your bangs down the middle.
- Gather all your hair and tie it into a messy side ponytail.
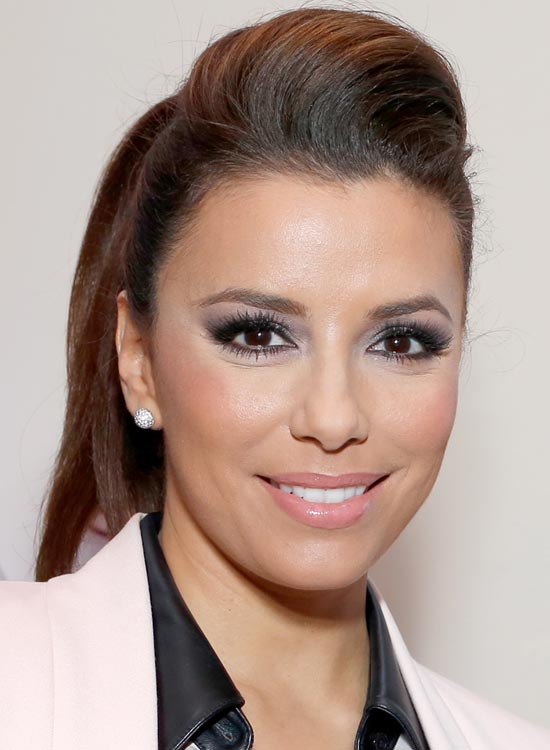
4. Pouf Ponytail
Gabriella (played by Eva Longoria) was definitely my favorite Desperate Housewife. (Who was yours? Comment below to let me know!) Eva Longoria is the queen of sleek-but-simple hairdos. Not only does the subtle pouf at the front provide a stylish detail to the hairdo, it also smoothens and tames down all the frizz at the top of your head.
What You Need
- Texturizing spray
- Sectioning clip
- Teasing comb
- Fine-toothed comb
- Bobby pins
- Hair elastics
How To Style
- Spritz on some texturizing spray all over your washed, dried hair.
- From about one inch in, section off all the hair between your temples.
- Tease down all the hair that is behind the sectioned off hair with the help of a teasing comb.
- Unclip the sectioned off hair.
- Use a fine-toothed comb to smooth over the sectioned off hair over the teased hair.
- Gather the smoothed over hair in the middle and pin it at the back of your head.
- Tie up all your hair in a high ponytail to finish off the look.
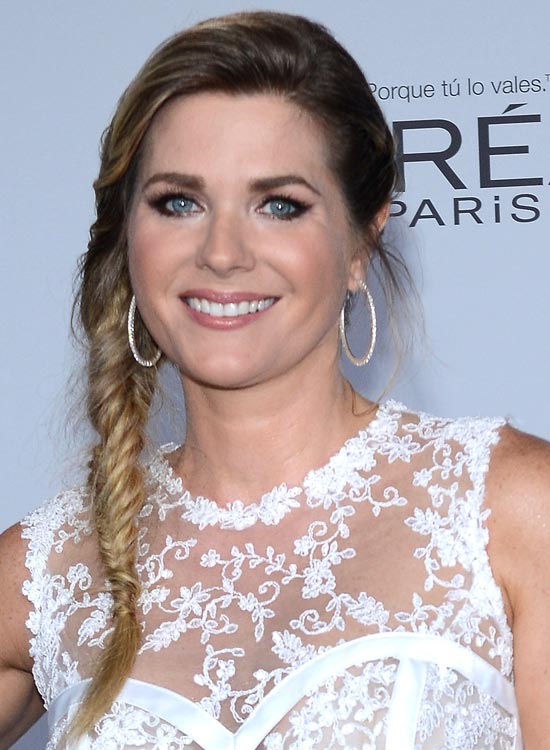
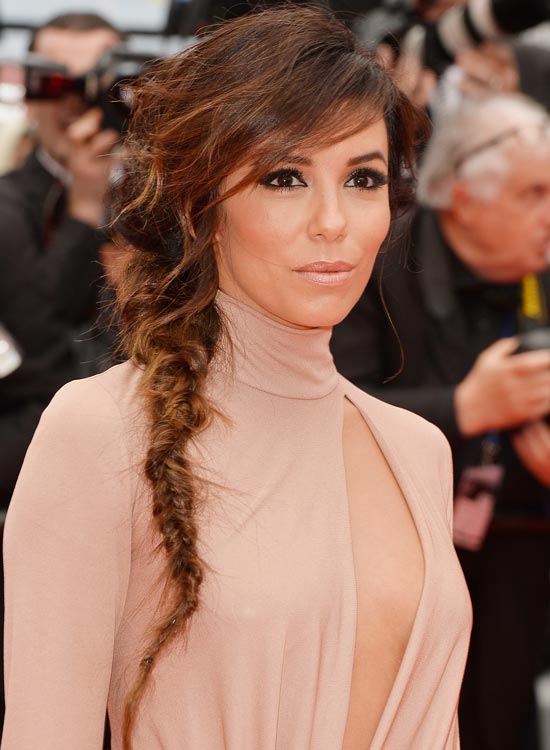
5. Messy Side Fishtail Braid
There are days when I have two-day-old hair and don’t have the time to wash it. This look is what I go for on those days. The messy side fishtail braid lets you get some control over your wavy hair while looking stylish and edgy at the same time.
What You Need
- Texturizing spray
- Hair elastics
How To Style
- Spritz on lots of texturizing spray over all your hair.
- Part your hair on one side.
- Gather all your hair on one side and tie it into a low ponytail.
- Divide your ponytail into two sections.
- Â Pick up a thin section of hair from the outside of the first section and add it to the inside of the second section.
- Now, pick up a thin section of hair from the outside of the second section and add it to the inside of the first section.
- Keep repeating steps 5 and 6 until you have braided all your hair.
- Secure the end of the braid with a hair elastic.
- Cut off the hair elastic at the top of your braid to loosen it up and finish off the look.
6. Dutch Braided Bun
Have a fancy date coming up with your significant other? Then you’ve GOT to try this style out. Two French braids go all around your head and merge into a small low bun. The bun and the braids come together in a perfect symmetrical composition.
What You Need
- Texturizing spray
- Hair elastics
- Bobby pins
- Light hold hair spray
How To Style
- Spray texturing spray over all your washed and dried hair.
- Part your hair down the middle and divide it into two sections, one on either side of your face.
- From the left section, pick up a 2-inch section of hair from near your temple and start Dutch braiding it.
- To do so, divide your hair into three sections and braid it outwards (flipping the side sections of hair under the middle section) and adding more hair into the braid from either side, each subsequent time you braid.
- Once your braid has reached the end of your head, simply braid it till the end and secure it with a hair elastic.
- Repeat steps 3 to 5 on the other side.
- Roll one braid into a flat bun and secure it to your head by inserting bobby pins into it from all directions.
- Roll the second bun into a flat bun and lay it over the first bun and secure it with bobby pins in the same manner.
- Finish off with some light hold hair spray to secure the updo in place.
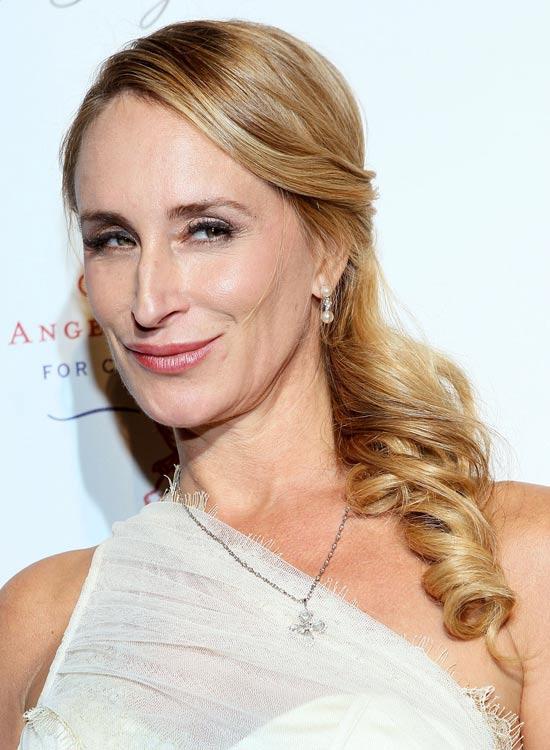
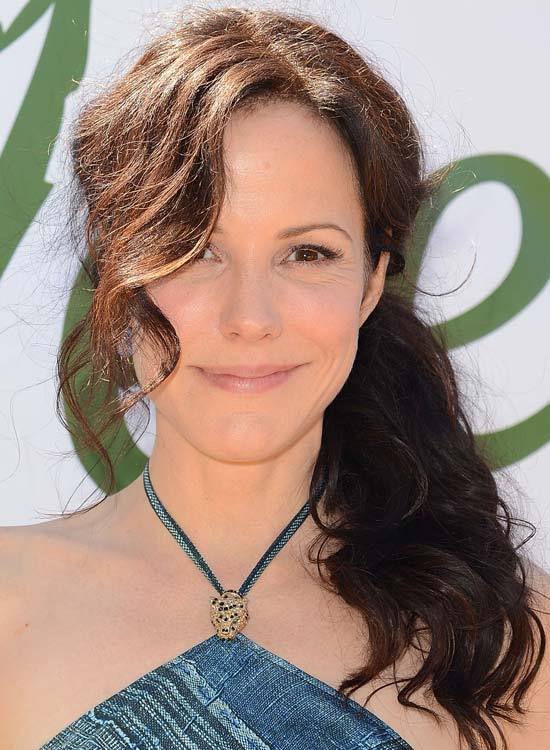
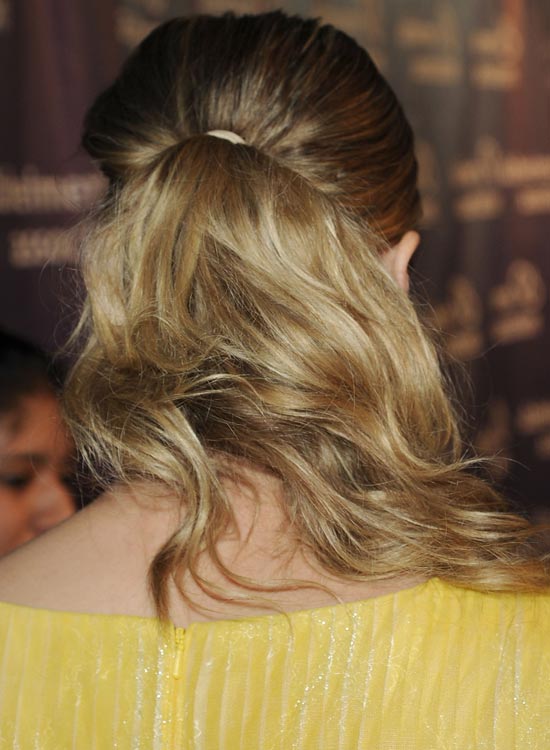
7. Side Ponytail
You know those days when no matter how long you fiddle with your curling iron, your curls turn out just…meh? Well, this is the style that you want to do with them. With minimal heat application and a sleek finished look, this hairstyle is to die for. The simple side ponytail with the concealed hair elastic look is the epitome of chic elegance.
What You Need
- Fine-toothed comb
- Hair elastic
- Bobby pins
- 2-inch curling iron
How To Style
- Part your hair on one side and use a fine-toothed comb to smooth over all the hair to one side.
- Tie all your hair into a low side ponytail.
- Use thin sections of hair from the ponytail to wind around the hair elastic holding your ponytail and conceal it.
- Secure this hair concealing your hair elastic with a few bobby pins tucked under the ponytail.
- You can curl the end of your ponytail as a whole with a 2-inch curling iron to add a little something to your whole look.
8. Messy Ponytail
Do you want to just throw your hair into a messy ponytail and be done with it? I know I do on most days. Then let’s take some hair inspiration from Kristen Stewart. She is absolutely working that high ponytail with the volumized top. And you can too! Read on to find out how.
What You Need
- Texturizing spray
- Teasing comb
- Fine-toothed comb
- Hair elastics
How To Style
- Prep your washed, dried hair with some texturizing spray.
- Create a deep parting on one side.
- On the side with more hair, tease down all the hair on top of your head.
- Now, with a fine-toothed comb, gently smooth back all the teased hair in such a way that you retain the volume.
- Gather all your hair and tie it into a high ponytail to finish off the look.
9. Twisted Intricate
I know you are probably thinking how on earth you will be able to do this hairstyle. Well, let me tell you – this hairstyle may look intricate, but is actually very easy to perfect. Have a little faith in yourself!
What You Need
- Texturizing spray
- Bobby pins
- Hair elastics
- Medium hold hair spray
How To Style
- Â Spritz on some texturizing spray all over your hair.
- Swoop all the hair that is on top of your head to one side.
- Pick up a 3-inch section of hair from near your temple, braid it very loosely, and pin it at the back of your head.
- Tie all your hair into a slightly off-center ponytail at the back of your head.
- Divide the hair into two sections.
- Twist both the sections until the very end, then intertwine them with each other.
- Roll this twisted ponytail into a messy low bun and secure it by inserting bobby pins into it from all directions.
- You can pull out and loosen up the braid even more to give it a messier look.
- Finish off with some medium hold hair spray to secure the do in place.
10. 4 Strand Side Braid
Is this 4-strand braid flipping your mind? Because it totally did mine. And I thought I would never be able to do it in a million years. But, guess what? It’s just as easy to do as a simple braid. You’ll get the hang of it once you’ve braided your hair a couple of times.
What You Need
- Texturizing spray
- Hair elastics
- Your nifty fingers
How To Style
- Prep your washed, dried hair with some texturizing spray.
- Part your hair on one side.
- Tie all your hair into a low side ponytail.
- Divide your ponytail into 4 sections. Starting from the section closest to your face, let’s number all the sections 1, 2, 3, and 4.
- OK now pay close attention. Flip section 1 over section 2, under section 3, and over section 4.
- Now, that your section 1 is the furthest section from your face, renumber the sections in the same manner as you did in step 4. This means, starting from the section now closest to your face, your sections are 1, 2, 3 and 4.
- Now repeat steps 5 and 6 until you have braided your hair until the very end, and secure it with a hair elastic.
- Cut off the hair elastic at the top of your braid.
- Pull out some wisps of hair to frame your face and finish off the look.
11. Crimped Side Bun
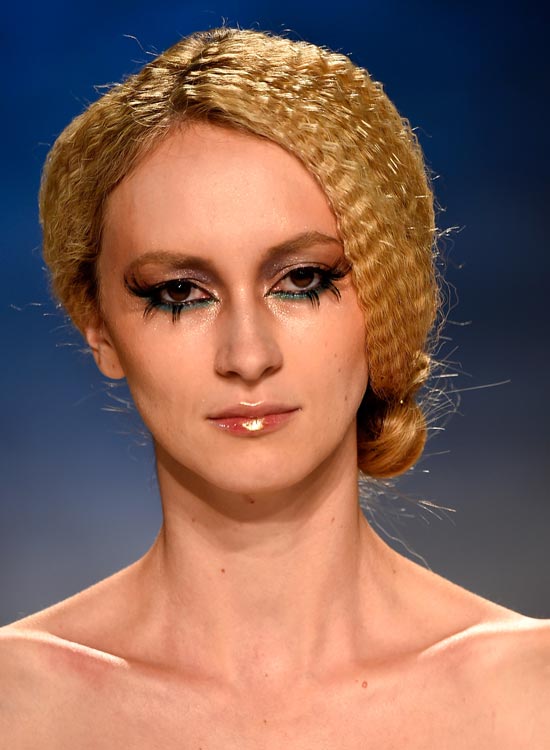
Looks like the crimped hair look did not die out after the 90’s! In fact, it seems to be making a major comeback! This crimped hair look adds a sweet touch of whimsy to an otherwise simple low side bun.
What You Need
- Texturizing spray
- Heat protectant serum/spray
- Hair crimping iron
- Bobby pins
- Light hold hair spray
How To Style
- Prep your washed, dried hair with some texturizing spray and heat protectant.
- Picking up 3-inch sections of hair at a time, crimp the top half of all your hair.
- Part your hair on one side.
- Gather all your hair on one side and roll it up into a low side bun.
- Secure the bun to your head by inserting bobby pins into it from all directions.
- Finish off with some light hold hair spray to complete the look.
12. Puffy Braid
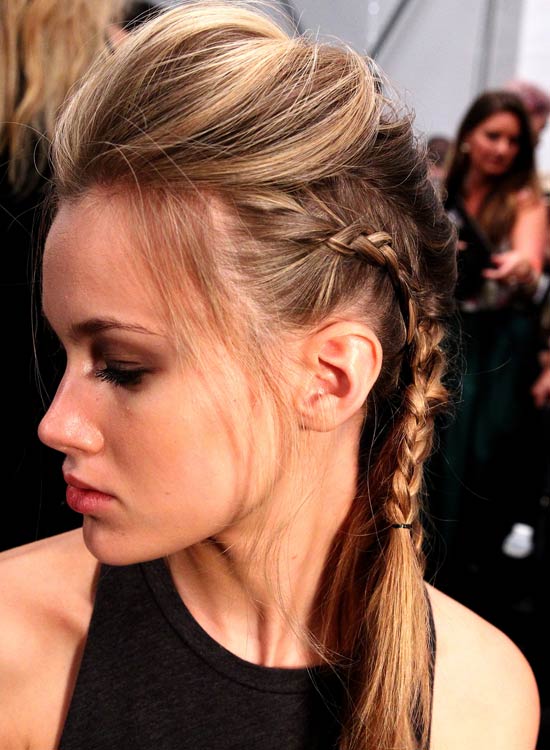
No matter how much of a softy you are, I’m sure deep down you have a biker chick inside you who is waiting to get out. To channel her out, try this edgy hair look. The teased down pouf at the top and the 3 French braids come together to create a beautiful, yet edgy look.
What You Need
- Texturizing spray
- Sectioning clips
- Teasing comb
- Fine-toothed comb
- Hair elastics
- Light hold hair spray
How To Style
- Prep your washed and dried hair with a texturizing spray.
- Divide your hair into three sections with the help of sectioning clips. The middle section must contain all the hair between your temples and the other two sections must contain the rest of the hair on either side.
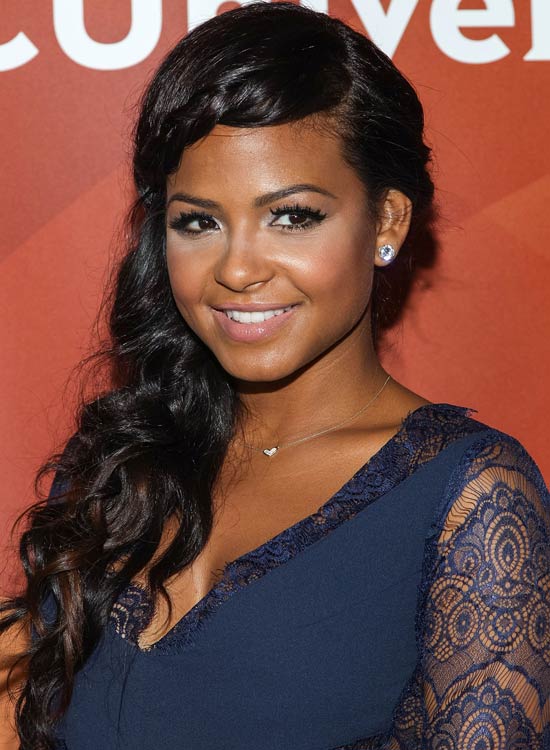
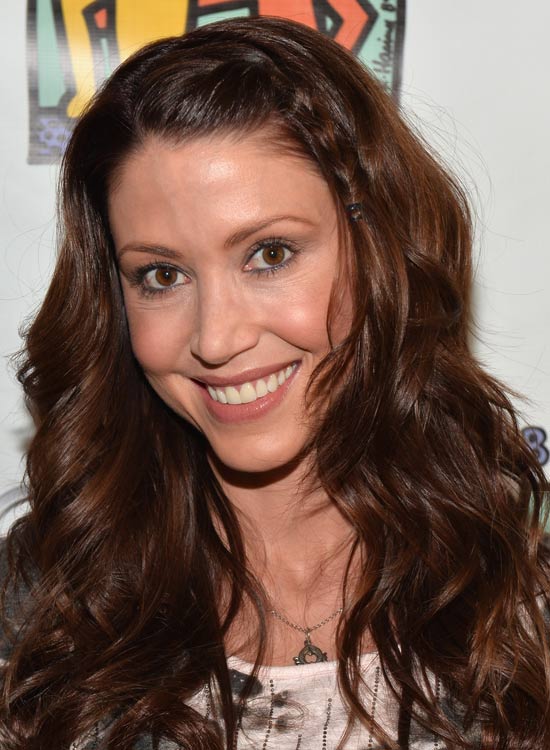
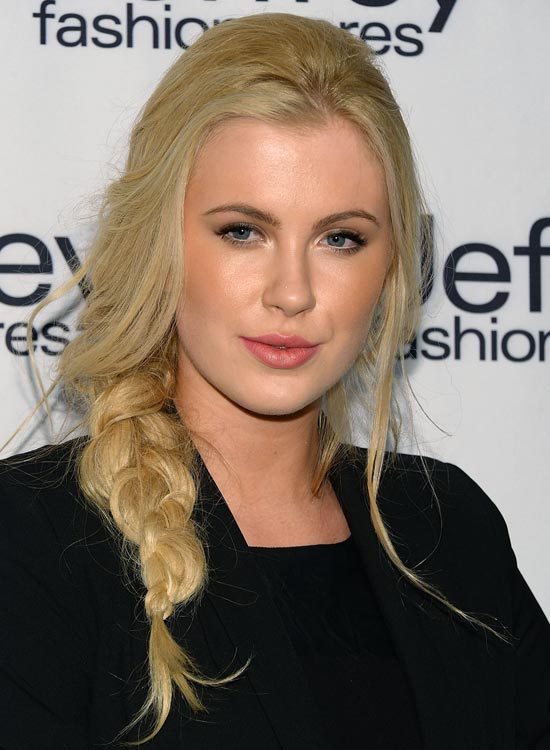
- Remove the sectioning clip from the middle section and tease down all the hair at the top of your head.
- Use a fine-toothed comb to gently smooth down the teased hair, but retain the volume.
- Start French braiding the middle section of hair by adding more hair into the braid with each subsequent twist of your braid.
- Once you reach the end of your head, simply secure the tail with a hair elastic.
- Now, pick up a 2-inch section of hair from the front of your left section and start Dutch braiding it.
- To do so, divide your hair into three sections and braid it outwards (flipping the side sections of hair under the middle section) and adding more hair into the braid from either side with each subsequent turn of the braid.
- Once you reach the end of your head, simple braid till the end of your hair and secure it with a hair elastic.
- Repeat steps 7 to 9 on the other side.
- Pull out some wisps of hair to frame your face.
- Finish off with some light hold hair spray to secure the braids in place.
13. Side Thick Braid
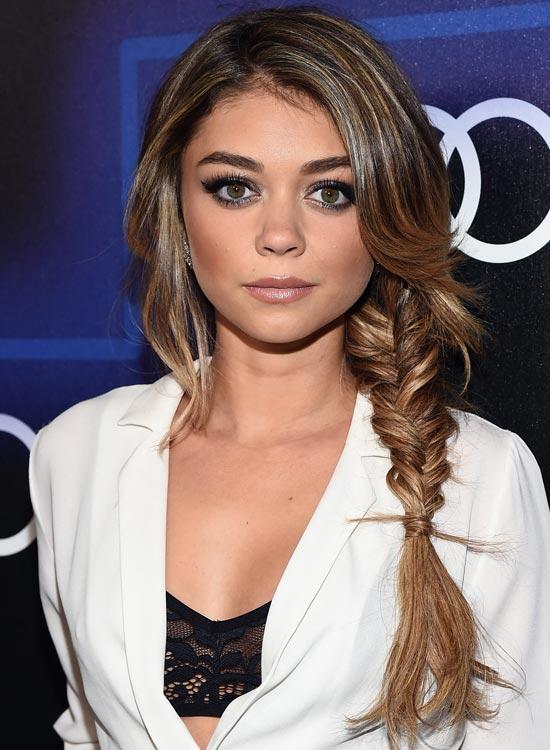
Yes, it’s a simple fishtail braid. But, of course, my queen Sarah Hyland has managed to add a flair of sensuality to it. She has transformed this simple hairstyle by loosening it up, hiding away her hair elastic, and pairing it with face framing and flirtatious bangs.
What You Need
- Texturizing spray
- Hair elastics
- Light hold hair spray
How To Style
- Prep your hair with texturizing spray.
- Leaving out your bangs, flip all your hair over one shoulder.
- Divide your hair into two parts.
- Pick a thin section of hair from the outside of the right section and add it to the inside of the left section.
- Now, pick a thin section of hair from the outside of the left section and add it to the inside of the right section.
- Repeat steps 4 and 5 alternately until you reach the end of the braid.
- Secure the end of the braid with a hair elastic.
- Pick up a few strands of hair from the tail of your braid and wrap them around the hair elastic at the end of the braid to conceal it.
- Secure this wrapped around braid with the help of a bobby pin.
- Spread apart and loosen up the braid to give it more dimension.
- Part your bangs to one side.
- Finish off with some light hold hair spray.
14. Side Short Lean Fish Braid
A simple fishtail braid will serve you well in your quest to tame down the messy entanglement of your frizz and your waves. It will prevent your hair from descending into a nest of knots and tangles and sort out your life in the most stylish way possible.
What You Need
- Texturizing spray
- Paddle brush
- Hair elastics
How To Style
- Spray texturizing spray all over your washed, dried hair.
- Brush all your hair over to one side and tie it into a side ponytail.
- Fishtail braid this side ponytail by dividing it into two parts, alternately picking up a thin section of hair from the outside of one section and adding it to the inside of the other section.
- Secure the braid at the end with a hair elastic and cut off the hair elastic at the top to finish off the look.
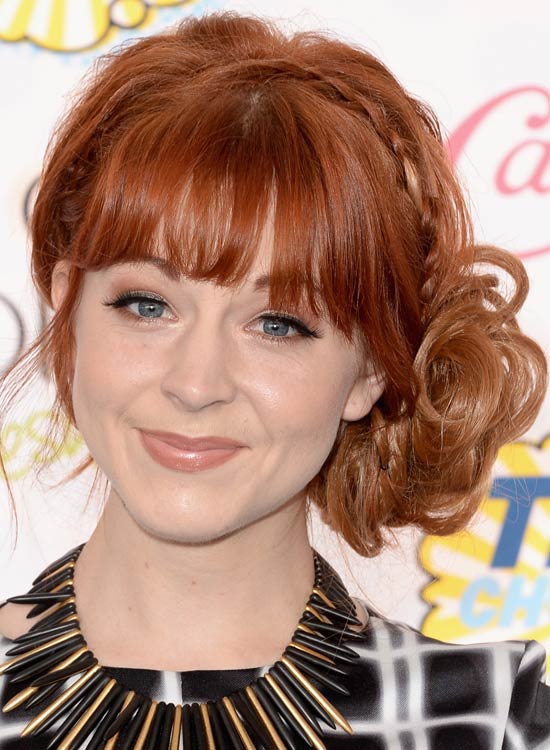
15. Braided Chignon
Not only is Lindsey Stirling a baller violinist (really, check out her stuff on YouTube), she is also a super cool fashionista. Her side braided chignon has a messy essence to it, which is enhanced by the full fringes at the front that cover her forehead. The chignon is perky and easy to style.
What You Need
- Texturizing spray
- Bobby pins
- Hair elastic
- Medium hold hair spray
How To Style
- Spritz texturizing spray all over your washed and dried hair.
- Pick up a 3-inch section of hair from right above your left ear, braid it right till the end, and secure it at the end with a hair elastic.
- Place the braid across the top of your head and secure it behind your right ear with some bobby pins crossed over each other.
- Gather all your hair on one side and tie it into a low side ponytail.
- Pick a 1-inch section of hair from your ponytail, roll it into a ringlet, and pin it to your head right next to the ponytail.
- Keep repeating step 5 until all your hair has been pinned into ringlets and have made a bun.
- Finish off with some medium hold hair spray to secure the updo in place.
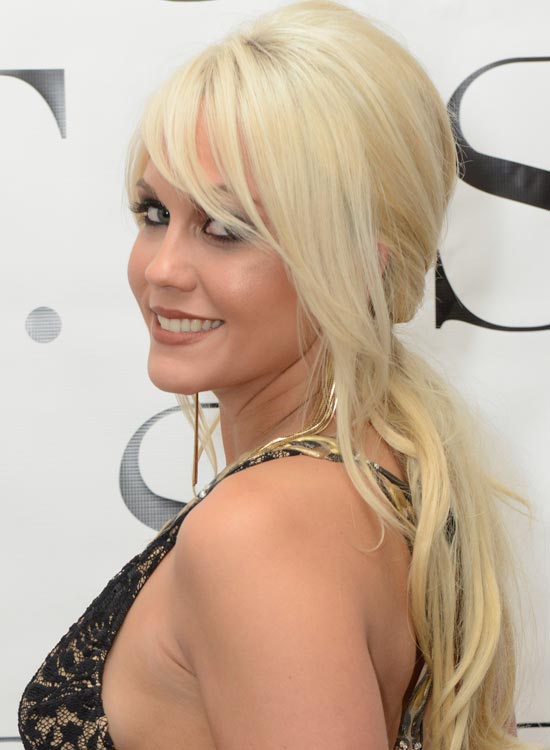
16. Wavy Long Platinum Hairdo
This my internal monologue every morning in front of the mirror- “Ponytail? No ponytail? Ponytail? No ponytail?” x 1000. For us indecisive ladies out there, this is the perfect solution. With your bangs and all the hair at the front left out to frame your face, and the rest of your hair tied up at the back, you will create a perfect illusion.
What You Need
- Hair elastic
- 1.5-inch curling iron
How To Style
- Get your hair cut in long layers with long, side-swept bangs.
- Leaving out your bangs and half of your topmost layer, sweep all your hair back and tie it into a low ponytail.
- Part your bangs and all the other left out hair on one side.
- Curl the lower half of all the hair in the front to finish off the look.
17. Golden Spiral Curls
Need a hairdo for that fancy wedding that’s right around the corner? Mature and elegant, this hairdo is perfect for any formal event. With the curled ends twisted up to create big spiral curls, and your hair pinned back, this look hearkens back to the luxuries of the olden times.
What You Need
- Heat protectant serum/spray
- 1.5-inch curling iron
- Bobby pins
- Light hold hair spray
How To Style
- Apply heat protectant all over your washed and dried hair.
- Part your hair on one side.
- Pick up 2-inch sections of hair at a time, and curl the lower half of all your hair.
- Â Gently sweep back all the hair from the front and pin it in the center at the back of your head.
- Flip all your hair over one shoulder and give it a twirl with your fingers so that it gathers into one big curly bunch.
- Finish off with some light hold hair spray to prevent the curls from unraveling throughout the day.
18. The High Ponytail
Is there anything worse than your cute ponytail slowly inching its way downwards throughout the day? I think not. Take control of your unruly mane by slicking it back into a super high ponytail. Wrapping a section of hair around your ponytail will make you look insanely hot and prevent your ponytail from drooping down.
What You Need
- Smoothening serum
- Fine toothed comb
- Hair elastic
- Bobby pins
How To Style
- Apply smoothening serum over all your washed, dried hair.
- Comb back all your hair and tie it into a ponytail at the very top of your head.
- Pick up a ½-inch section of hair from your ponytail and wrap it around the hair elastic holding your ponytail.
- Secure the wrapped up hair with a bobby pin behind the ponytail to finish off the look.
19. The Sleek Side Ponytail
We all probably already do this with our hair. But this loose ponytail looks so cute that I couldn’t help putting it on this list. This ponytail is tied loosely and has a sleek effervesce to it. It is informal yet smart. You can wear this hairdo for a casual day out for running some errands.
What You Need
- Sea salt spray
- Hair elastic
How To Style
- Spritz on some sea salt spray all over your hair.
- Part your hair down the middle.
- Flip all your hair over one shoulder and tie it into a loose low ponytail.
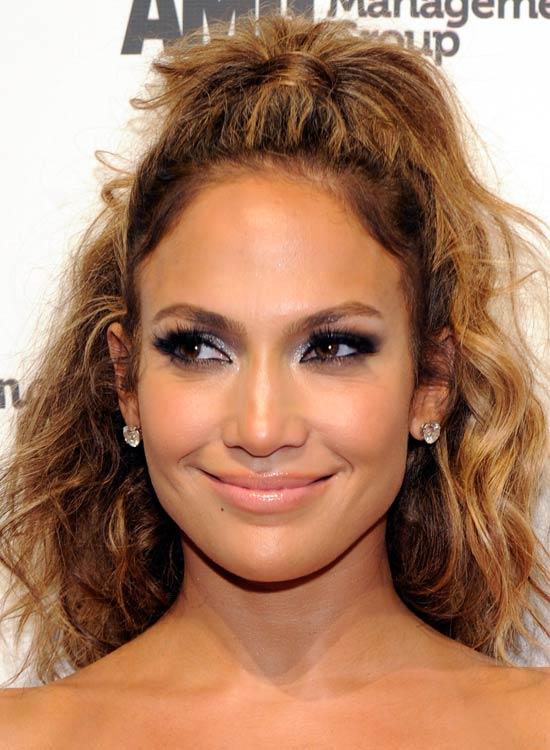
20. The Messy Half Up
Listen. If Jennifer Lopez can embrace her frizzy mane, you can too! This half up-half down hairdo will make the best use of your wavy hair and showcase it, instead of hiding it away with a braid or a ton of hair products.
What You Need
- Texturizing spray
- Volumizing mousse
- Hair elastic
- Bobby pins
How To Style
- Prep your washed, dried hair with lots of texturizing spray and volumizing mousse.
- Gather all the hair from ear to ear and tie it into a high half ponytail.
- Pick up a thin section of hair from your half ponytail and wrap it around the base of your ponytail to conceal the hair elastic.
- Secure the wrapped around hair under the ponytail with a couple of bobby pins.
- Finish off the look by tousling all your hair with your hands to get more volume.
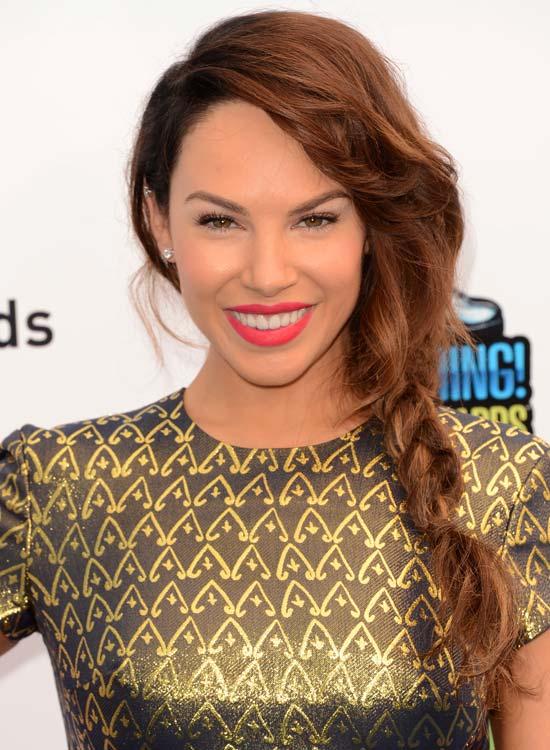
21. Messy Side Braid
Doing your hair right in the morning before heading to school is the w o r s t. But please spare your hair from throwing it up in a messy bun (for the third day in a row) and try out this simple braid style.
This long, side messy braid has a chunky character that is perfect for a full day of attending classes. With a few spritzes of sea salt spray, you can add a unique texture to your otherwise boring braid.
What You Need
- Sea salt spray
- Hair elastic
How To Style
- Get your hair cut into long side swept bangs.
- Spray on some sea salt spray over all your hair.
- Create a deep parting on one side and flip all your hair over one shoulder.
- Â Leaving out your bangs, braid all your hair, and secure it at the end with a hair elastic.
- Loosen up your braid and spritz on some more sea salt spray to complete the look.
22. Tousled Banged Braid
Gone are the days of using oodles of hair gel and hair spray to completely sleek down your hair. (Thank god.) Messy hair is all the rage this season. This messy side braid does not have a consistent thickness to it. It is heavily bumped at the top, followed by a lean style at the bottom. The loose bangs at the top give volume to the braid, making it appear thick and healthy.
What You Need
- Texturizing spray
- Hair elastics
- Sea salt spray
How To Style
- Get your hair cut in long, side swept bangs.
- Prep your washed, dried hair with lots of texturizing spray.
- Leaving out your bangs, flip all your hair over one shoulder and tie it into a side ponytail.
- Now, divide your ponytail into two sections and fishtail braid it.
- To do so, divide your ponytail into two parts and alternately pick up a thin section of hair from the outside of one section and add it to the inside of the other section.
- Cut off the hair elastic at the top of your braid.
- Part your bangs on the side that your braid is.
- Loosen up the braid with your fingers to give it a super messy look.
- Finish off with a few spritzes of sea salt spray to get a rougher look.
23. Ponytail Braid
My mom used to pull my hair up into a tight ponytail and then braid it to make sure my hair did not open up throughout the day. This hairstyle takes inspiration from that age-old schoolgirl look. The messy texture and volume added to it help to modernize this look.
What You Need
- Texturizing spray
- Paddle brush
- Hair elastics
- Light hold hair spray
How To Style
- Spray on texturizing spray all over your washed and dried hair.
- Brush back all your hair and tie it into a high ponytail.
- Braid the ponytail right till the end and secure it with a hair elastic.
- Loosen up the top of the braid by pulling it apart from the center to create a more vivacious hair look.
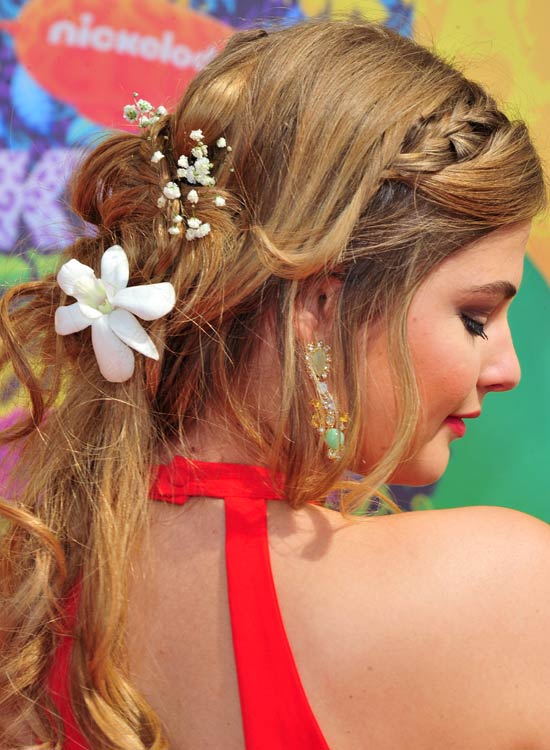
24. Messy Half Fusion
Who doesn’t want to look like a flower princess who spreads sunshine all around, right? This floral half up-half down look will help you do just that. The messy half up fused with a bun provides for a chic and elegant appeal. It’s both flirtatious and innocent at the same time.
What You Need
- Texturizing spray
- Bobby pins
- Light hold hair spray
- Fresh flowers
How To Style
- Prep your washed, dried hair with some texturizing spray.
- Part your hair on one side.
- Pick up a 2-inch section of hair in the front from the side of your parting with more hair, and start French braiding it.
- Once your French braid has reached till your ear, secure it with bobby pins.
- Pick up random sections of hair, roll them into small ringlets, and pin them to the back of your head with the help of bobby pins.
- Keep repeating the previous step until you are satisfied with how your hair looks.
- Finish off with a few spritzes of light hold hair spray and some fresh flowers.
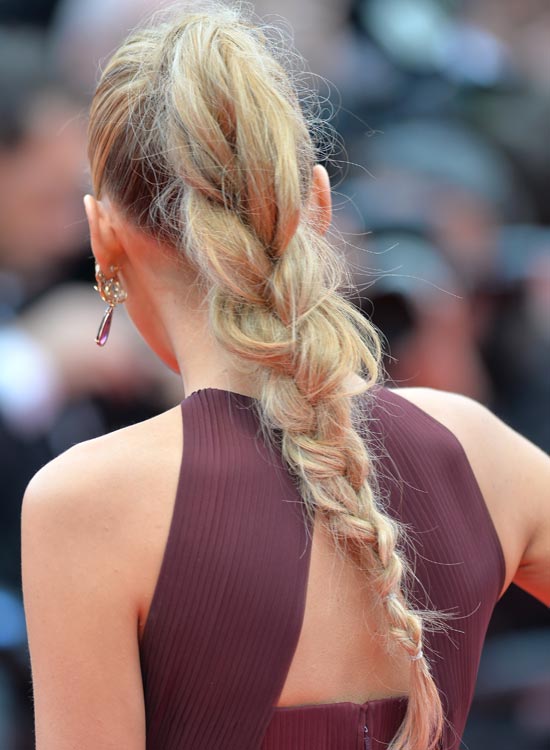
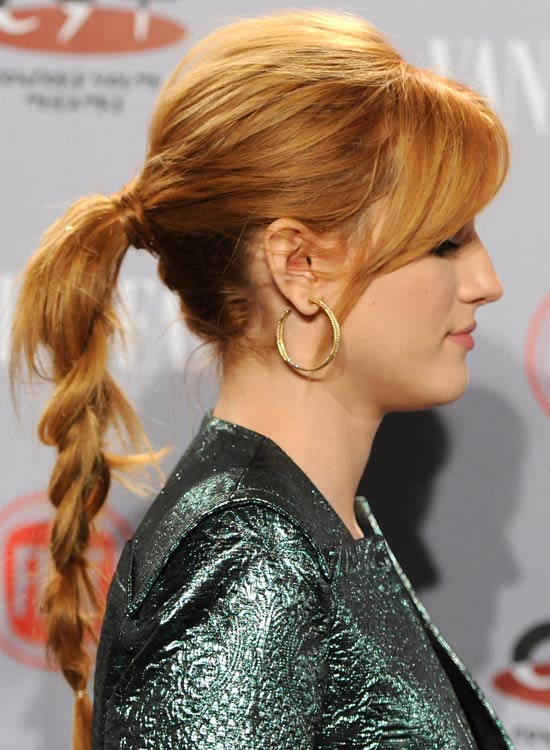
25. Thick Ponytail Braid
Wanna look like a fierce biker chick? Well, I’ve got you covered! Trust Bella Thorne to take a simple braided ponytail and elevate it to a whole new level of chicness. The side swept bangs and loosened up braid add a youthful character to the whole look. You can sport this look to school or to a night out in town.
What You Need
- Texturizing spray
- Hair elastics
- Bobby pins
- Light hold hair spray
How To Style
- Get your hair cut in short side swept bangs.
- Leave out your bangs, and tie all your hair into a high ponytail.
- Â Wrap a thin section of hair around the base of your ponytail to hide the hair elastic.
- Secure this wrapped up hair with the help of bobby pins inserted under the ponytail.
- Braid your ponytail right till the end and secure it with a hair elastic.
- Loosen and roughen up your braid a little to give it a more dynamic look.
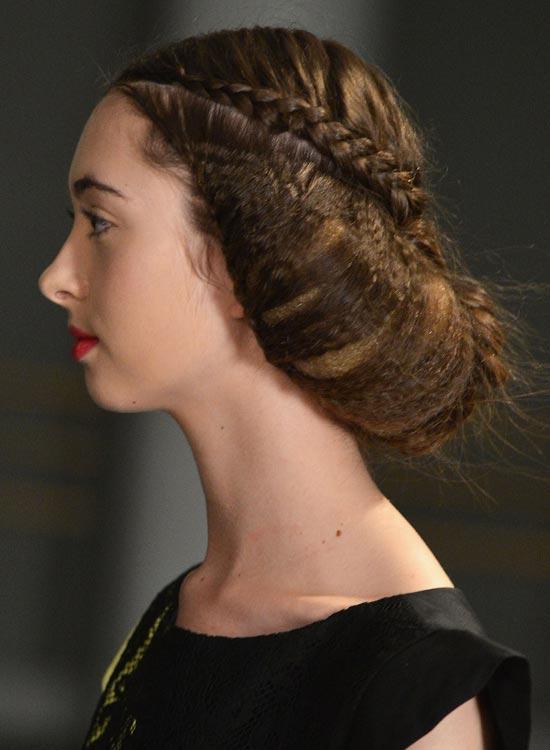
26. Messy Braided Bun
Doesn’t this look like a painting from 17th century England? This crimped hairstyle with French braids and tucked under bun may look a bit much, but can be perfectly paired with a button-down shirt and some trousers for a day at work.
What You Need
- Texturizing spray
- Heat protectant serum/spray
- Crimping iron
- Bobby pins
- U-pins
- Hair elastics
- Strong hold hair spray
How To Style
1. Prep your washed, dried hair with some texturizing spray and heat protectant.
2. Crimp the lower half of all your hair.
3. Part your hair down the middle.
4. Pick up a 2-inch section of hair from near your left temple and start Dutch braiding it.
5. To do so, flip the side sections under the middle section of the braid when braiding, and add more hair into the braid with each subsequent twist of the braid.
6. Once your braid has reached the back of your head, secure it there with the help of some bobby pins.
7. Repeat steps 4 to 6 on the other side.
8. Combine both your Dutch braids into one simple braid and secure its end with a hair elastic.
9. Gather all your hair (including your braid) and tie it into a low ponytail.
10. Roll your ponytail backwards into a bun.
11. Tuck this rolled up bun under all the hair in your head so that it is completely hidden from view.
12. Secure this bun to your head with the help of bobby pins and U-pins.
13. Finish off with some strong hold hair spray to secure the do in place.
27. The Messy Side Ponytail
Want to add an element of mystery to your look? Look no further! This side ponytail, with beachy waves and side-swept bangs covering half of your face, will get everyone intrigued.
What You Need
- Sea salt spray
- Hair elastic
- 1-inch curling iron
How To Style
1. Get your hair cut in long, face framing bangs.
2. Spritz on sea salt spray all over your washed and dried hair.
3. Leaving out your bangs, gather all your hair on one side and tie it into a low side ponytail.
4. Part your bangs on the opposite side of your ponytail.
5. Curl your bangs a little to add more dimension to your look.
28. Messy Half Done Chignon
The messy half done chignon exudes elegance and sophisticated charm. This look can be perfectly paired with a sundress and some sandals for a day out on the beach. The undone chignon evolves into a graceful do by itself.
What You Need
- Texturizing spray
- Bobby pins
- Light hold hair spray
How To Style
1. Spray on texturizing spray over your hair.
2. Part your hair on one side.
3. Gather all of your hair onto the side of the parting with more hair.
4. Twist and roll all your hair into a super rough low bun.
5. Secure this messy chignon bun to your head with bobby pins tucked haphazardly into it. It does not matter if some of your hair falls out as it only adds to the look.
6. Finish off with some light hold hair spray to set the chignon in place.
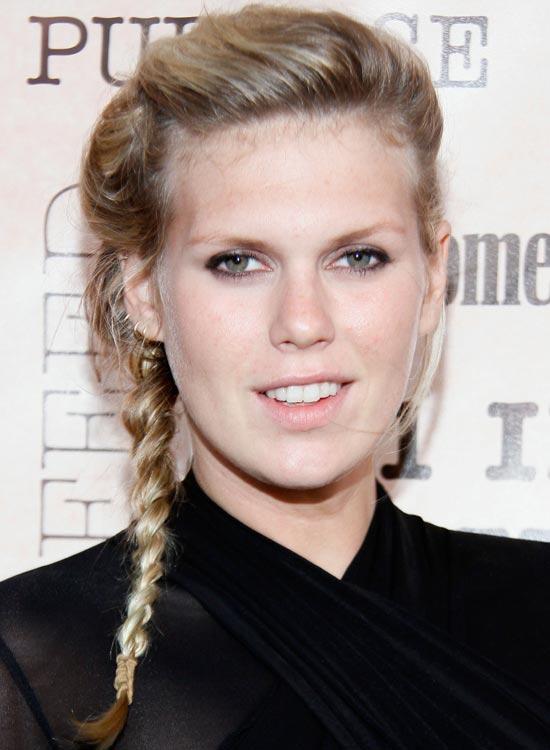
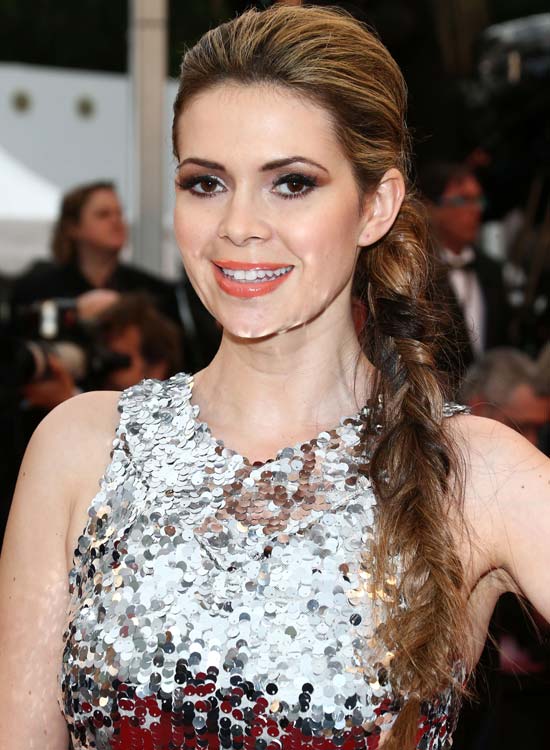
29. Messy Sleek Fishtail
This sleek fishtail braid with a messy top gives off a funky and perky vibe. With its wet hair spiky look at the top, this hairdo is perfect for a concert outing. I guess it’s time for you to invest in a wet hair gel.
What You Need
- Wet hair gel
- Hair elastics
How To Style
1. Apply wet hair gel on the top half of your hair.
2. Tie all your hair into a low side ponytail.
3. Divide your ponytail into two parts to fishtail braid it.
4. Pick up a few strands of hair from the outer part of the left section and add it to the inner part of the right section.
5. Now, pick up a few strands of hair from the outer part of the right section and add it to the inner part of the left section.
6. Repeat steps 4 and 5 alternately until you reach the end of your braid, and secure the ends with a hair elastic.
7. Style the wet gelled hair on top of your head any way you want with the help of your fingers to finish off the look.
30. Medium Ponytail
Does the ponytail that you usually tie your hair into look dull and boring? I have the perfect solution for you! With just a few spritzes of sea salt spray, you can infuse some bounce into your ponytail and make it look super bubbly.
What You Need
- Texturizing spray
- Paddle brush
- Hair elastic
- Sea salt spray
How To Style
1. Spray some texturizing spray all over your washed, partially wet hair.
2. Brush all your hair back and tie it into a mid-level ponytail at the back of your head.
3. Spritz on some sea salt spray and roughen up your ponytail to add some more definition to your wavy hair.
31. Mini Side Braids
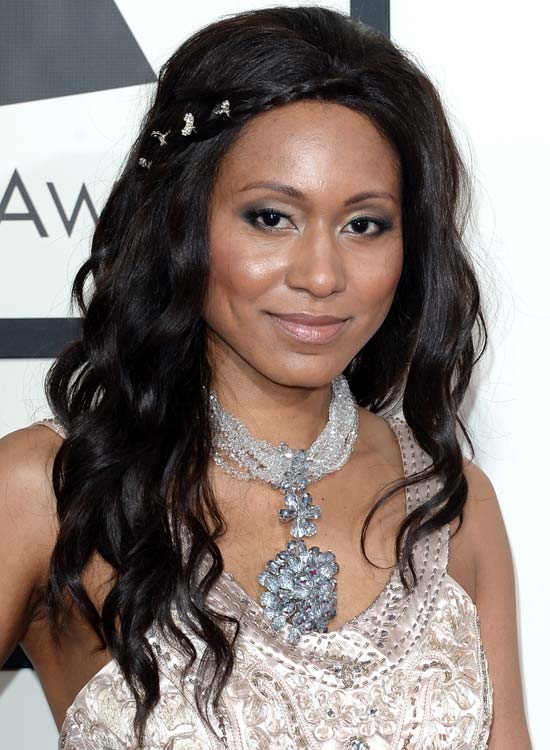
You’ve heard about contouring your face. But have you ever thought of contouring your hair? That sounds crazy, right? But this braided hairdo, with two braids cutting across your waves, does just that!
What You Need
- Texturizing spray
- Bobby pins
- Tiny bejeweled clips
- Light hold hair spray
How To Style
1. Prep your washed, dried hair with some texturizing spray.
2. Part your hair on one side.
3. Pick up a 1-inch section of hair from near your parting, right above your forehead.
4. Tightly braid this section of hair and pin it to the back of your head.
5. Pick another 1-inch section of hair from right next to the first braid and repeat the previous step.
6. Insert some tiny bejeweled accessories all along the length of your braids.
7. Finish off with some light hold hair spray.
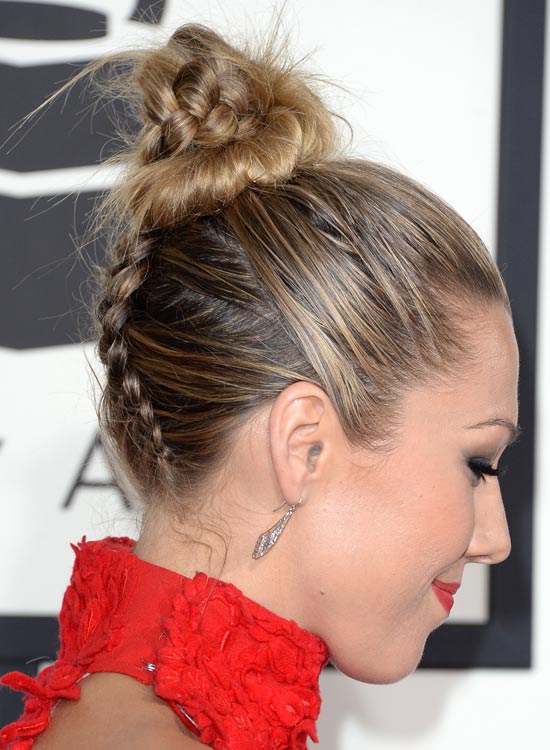
32. Inverted French Braid Bun
You’ve French braided your hair from the front, and you’ve French braided it from the sides. But have you ever thought of French braiding your hair from your neck? The cool braided bun pictured above proves that it would be a great idea.
What You Need
- Texturizing spray
- Hair elastics
- Fine toothed comb
- Bobby pins
- Strong hold hair spray
How To Style
1. Spritz on some texturizing spray all over your washed and dried hair.
2. Bend your head and flip all your hair over in front of you.
3. Pick up a 3-inch section of hair from the very base of your neck and start French braiding.
4. Once your French braid has gone past your ears, simply braid it till the end and secure it with a hair elastic.
5. Now, comb back all your remaining hair and twist it with the French braid.
6. Roll all your twisted hair into a bun at the top of your head.
7. Secure the bun to the top of your head by inserting bobby pins into it from all directions.
8. Finish off with some strong hold hair spray to prevent the bun from drooping down throughout the day.
33. Messy Wavy Braid
Who says you can’t sport a side braid to a formal event? This roughened-up side braid with gently swept back bangs is perfect for a business dinner or a gala event. Style it with some long dangling earrings, and you’re good to go!
What You Need
- Sea salt spray
- Bobby pins
- Hair elastic
- Light hold hair spray
How To Style
1. Prep your washed and dried hair with lots of sea salt spray.
2. Part your hair on one side.
3. Gently sweep back the hair from above your left ear and loosely pin it to the back of your head.
4. Repeat the previous step on the other side.
5. Gather all your hair over on one side and braid it till the end.
6. Secure the end with a hair elastic.
7. Now, roughen up your braid with your hands. Don’t be afraid to pull out the ends of your hair through your braid.
8. Finish off with some light hold hair spray to prevent the braid from disintegrating completely.
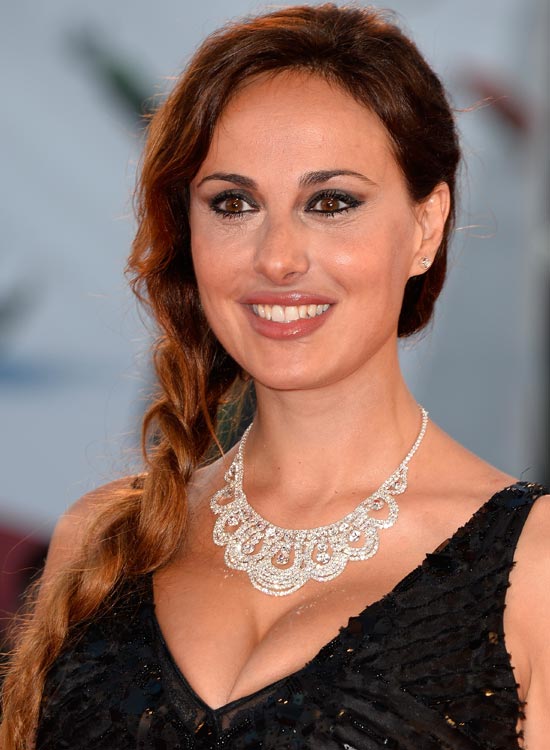
34. Long Messy Brown Braid
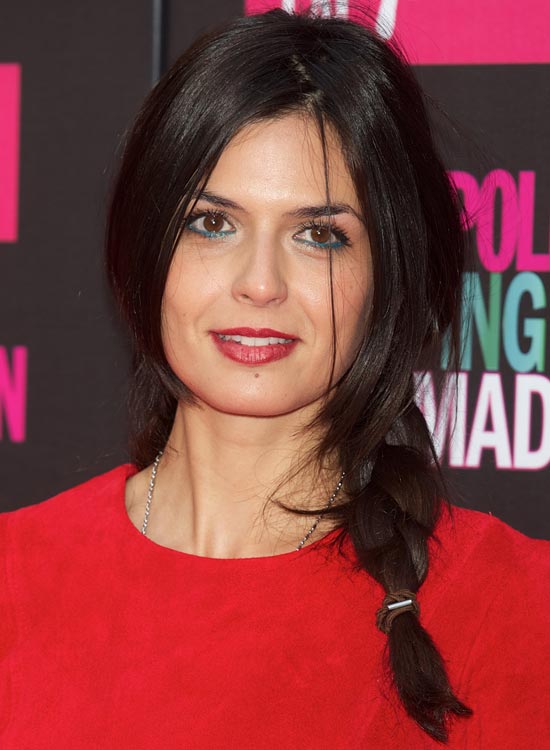
I think we have all experienced this phenomenon where we buy a bulk of hair elastics, but by the end of the week, there’s not a single one in sight. Well, this braided look that is left unsecured at the bottom is the perfect look to sport in those times.
What You Need
- Texturizing spray
- Paddle brush
- Hair elastic
- Strong hold hair spray
How To Style
1. Prep your washed, dried hair with some texturizing spray.
2. Part your hair down the middle.
3. Brush all your hair over to one side and
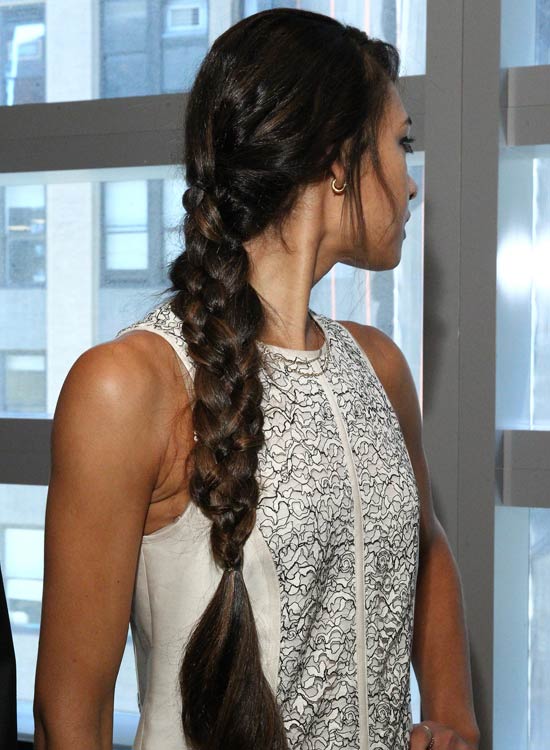
4. loosely braid it.
5. Spray on some strong hold hair spray at the end of your braid (instead of tying it with a hair elastic) to prevent the braid from opening.
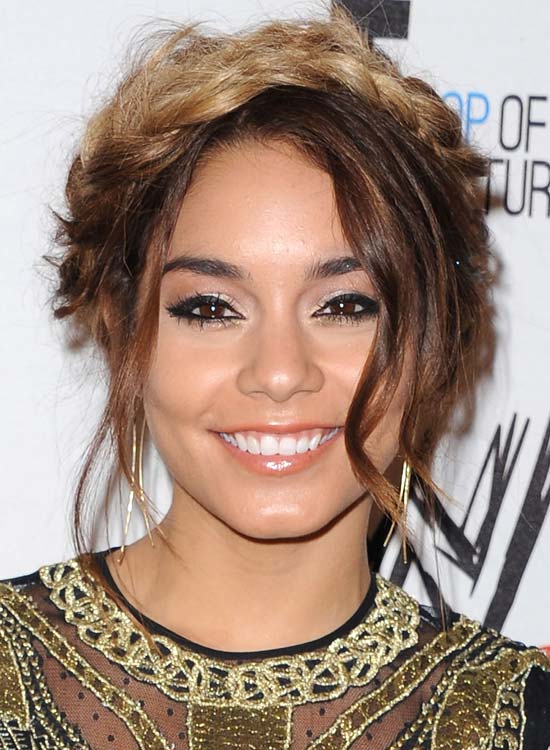
35. Ombre Headband Braid
Vanessa Hudgens strikes again with this rough milkmaid braid do! Not only is the look chic by itself, the tousled bangs in the front also add a hippie effect to it. Soft gold eye makeup can take this look to a whole new level.
What You Need
- Sea salt spray
- Hair elastics
- Bobby pins
- U-pins
- 1-inch curling iron
- Strong hold hair spray
How To Style
1. Spritz on some sea salt spray all over your hair.
2. Part your hair slightly off-center and divide all your hair into two sections.
3. Leave out a few tendrils of hair to frame your face.
4. Braid both the sections of hair so that you end up with a braid on both sides of your face.
5. Pick up the left braid, place it across the top of your head, and secure it with bobby pins near your right ear.
6. Repeat step 5 with your right braid.
7. Push in some U-pins all along the lengths of both braids to further secure them to your head.
8. Curl the tendrils of hair you had left out to frame your face to give them a softer look.
9. Finish off with some strong hold hair spray to prevent the braids from slipping down throughout the day.
36. The Thin Braid
If you are going for the whole lady pant suit look that is all the rage right now, this hairstyle is perfect to be paired with it. The brushed and pinned back hair and the tight braid down one side scream business casual style at its best.
What You Need
- Texturizing spray
- Paddle brush
- Hair elastic
- Bobby pins
How To Style
1. Spritz on texturizing spray all over your hair.
2. Brush back all your hair.
3. Pick up all the hair in the front, give it a twist, and pin it to the back of your head.
4. Gather all your hair and flip it over one shoulder.
5. Pick up the hair over your ear on the same side and pin it to the back of your head.
6. Tightly braid all your hair and secure it at the end with a hair elastic.
7. Pull out some wisps of hair from above your ears to finish off the look.
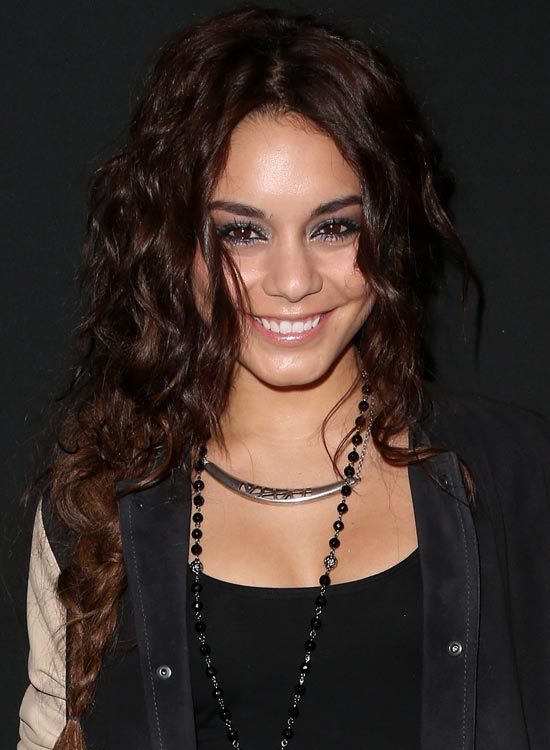
37. Tousled Braid
Vanessa Hudgens is an icon when it comes to bohemian fashion. You will never see her hair in anything but a mess of soft and relaxed curls. Hair looks like this one with half her wild hair out, and half of it braided down, are why she is the queen of Coachella fashion.
What You Need
- Texturizing spray
- Hair elastic
- 1-inch curling iron
How To Style
1. Get your hair cut in short layers.
2. Leaving out the first layer of your hair, gather all your hair to one side and braid it till the end.
3. Secure the end of the braid with a hair elastic.
4. Part your first layer of hair down the middle.
5. Pick up random sections of this left out hair and curl them to give your hair a more tousled look.
38. Interwoven Crown Braid
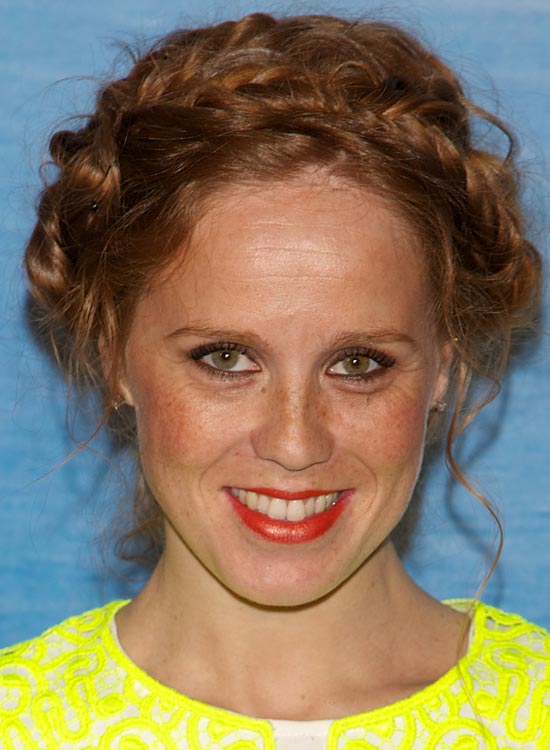
You have seen milkmaid braids done with simple braids. But have you ever seen them done with fishtail braids? This hairstyle will make you feel like the queen that you are as the braids placed atop your head make it look like you are wearing a crown.
What You Need
- Texturizing spray
- Hair elastics
- Bobby pins
- U-pins
- Medium hold hair spray
How To Style
1. Prep your washed, dried hair with some texturizing spray.
2. Part your hair down the middle and divide all your hair into two sections, with one section on each side.
3. Tie both sections into ponytails.
4. Divide your left ponytail into two sections and fishtail braid it by alternately picking up a thin section of hair from the outside of one section and adding it to the inside of the second section.
5. Secure the end with a hair elastic.
6. Repeat steps 4 and 5 with the other ponytail.
7. Cut off the hair elastics at the tops of both ponytails.
8. Place the right braid across the top of your head and secure it with bobby pins above/behind your left ear.
9. Repeat the previous step with your left braid.
10. Finish off the look by pulling out a few wisps of hair from above your ears, and a few spritzes of medium hold hair spray.
39. Chunky Short Side Braid
If you have got short layers in your hair, this hairstyle will suit you perfectly. Leaving out the first layer of your hair from your braid tricks people into thinking that you have a long bob until they look down and notice your braid.
What You Need
- Heat protectant serum/spray
- Straightening iron
- Hair elastics
- Smoothening iron
How To Style
1. Get your hair cut in short layers.
2. Leaving out your first layer (that frames your face), gather all your hair on one side and braid it till the very end.
3. Secure the end of the braid with a hair elastic.
4. Part your left out hair down the middle, apply some heat protectant, and straighten it.
5. Apply some heat protectant over your straightened hair to finish off the look.
40. Chunky Mixed Braid
Confused between doing a fishtail or a French braid? I would say, do both! This unique braid, which starts off as a simple braid and transitions into a fishtail braid, is perfect for a casual day in and a wild night out.
What You Need
- Texturizing spray
- Paddle brush
- Hair elastics
How To Style
1. Prep your washed and dried hair with texturizing spray.
2. Brush all your hair back and tie it into a ponytail.
3. Flip your hair over your shoulder and simply braid it about one-third of the way down.
4. Redivide the three sections of your braid into just two sections.
5. Fishtail braid those two sections by alternately picking up some strands from the outer part of one section and adding it to the inner part of the other section.
6. Secure the end of the braid with a hair elastic.
7. Finish off by loosening the braid with your hands to give it more texture and dimension.
41. Braided In
Are you one of those people who don’t have time to neatly part and section off their hair before they do an intricate hairstyle? If yes, this hairstyle was made just for you! With its haphazard French braids and messy fishtail, you will be putting effort without being overly cautious.
What You Need
- Sea salt spray
- Bobby pins
- Hair elastics
How To Style
1. Spritz on some sea salt spray all over your hair.
2. Starting from the front of your head, vertically divide your hair into three uneven sections.
3. French braid each of these three sections till the back of your head and then secure them with bobby pins.
4. Flip all your hair onto one side and divide it into two sections.
5. Fishtail braid all your hair by alternately picking up a thin section of hair from the outside of one section and adding it to the inside of the other section.
6. Secure the end of the braid with a hair elastic.
7. Loosen and roughen up all the braids with your hands to give your hair a messier look.
42. Braided Loose Tresses
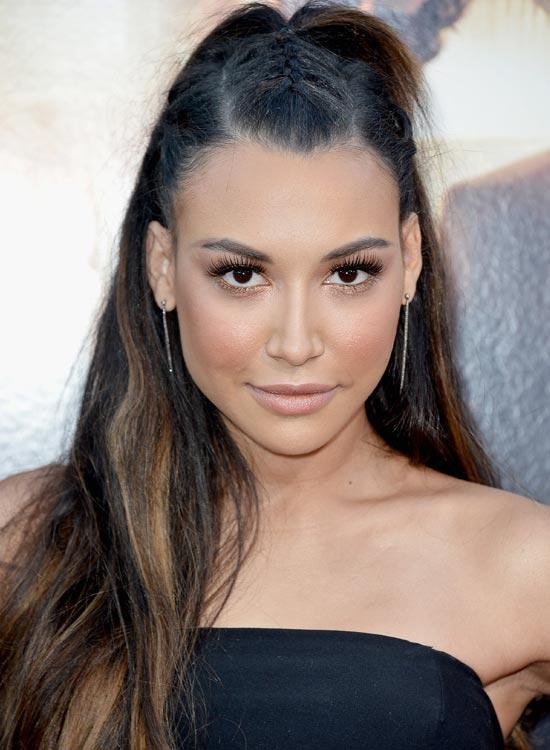
All hail our Queen of Badass Style, Naya Rivera! I spent a good part of my late teens watching Glee and wishing I were as hardcore as Santana. Being a tiny 5’3” pale girl who avoided confrontation at any cost kinda got in the way of that. But, at least, I can style my hair like hers. And you can too!
What You Need
- Texturizing spray
- Sectioning clips
- Hair elastics
- Bobby pins
- Medium hold hair spray
How To Style
1. Spray on texturizing spray all over your hair, paying special attention to the roots of your hair.
2. Divide your hair into three sections, with the middle section comprising of all the hair between your temples, and all the hair left above your ears comprising the other two sections.
3. From the middle section, pick up all the hair along your hairline and start French braiding.
4. Once your French braid has reached the crown of your head, secure it with a hair elastic into a high half ponytail.
5. Pick all the hair along the hairline of your left section and start French braiding.
6. Once the braid has gone past your ear, secure it to your head with some bobby pins.
7. Repeat steps 5 and 6 on the right section of hair.
8. Finish off with some medium hold hairspray to prevent the braids from unraveling throughout the day.
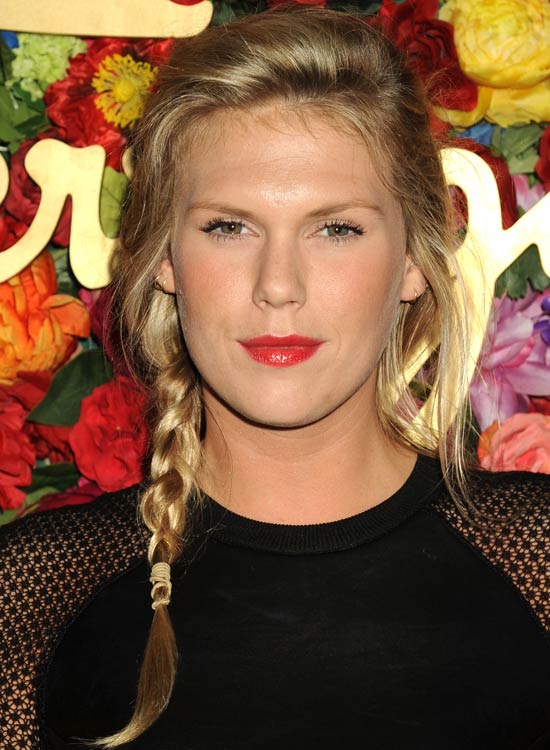
43. Golden Lean Braid
The lean golden braid with an unevenly combed top is an exquisite example of messiness in sync with elegance. All you need to achieve this high-class look is a paddle brush and a hair elastic. That’s it!
What You Need
- Paddle brush
- Hair elastic
How To Style
1. Brush all your hair over to one side.
2. Braid all your hair tightly into a side braid.
3. Push your fingers into the hair at the top of your head and pull them up to loosen the hair a little.
4. Pull out some tendrils of hair from near your ears to frame your face and finish off the look.
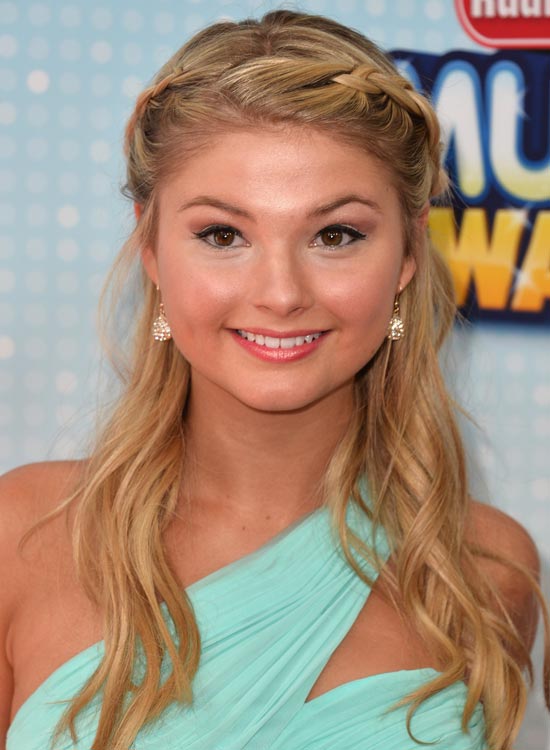
44. Side Braid With Medium Tresses
This cute, flirtatious hairstyle is the height of teeny bopper style. The asymmetrical French braids and the waves cascading down your shoulders perfectly frame your face and draw attention to those beautiful eyes.
What You Need
- Sea salt spray
- Bobby pins
- Light hold hair spray
How To Style
1. Spritz on some sea salt spray all over your washed and dried hair.
2. Part your hair down the middle.
3. Pick up a 3-inch section from right next to your parting and French braid it by adding more hair into the braid with each subsequent twist.
4. Once the French braid has gone past your ear, simply braid it a few more times and pin it to the back of your head.
5. Repeat steps 3 and 4 on the other side.
6. Finish off with some light hold hair spray to secure the braids in place.
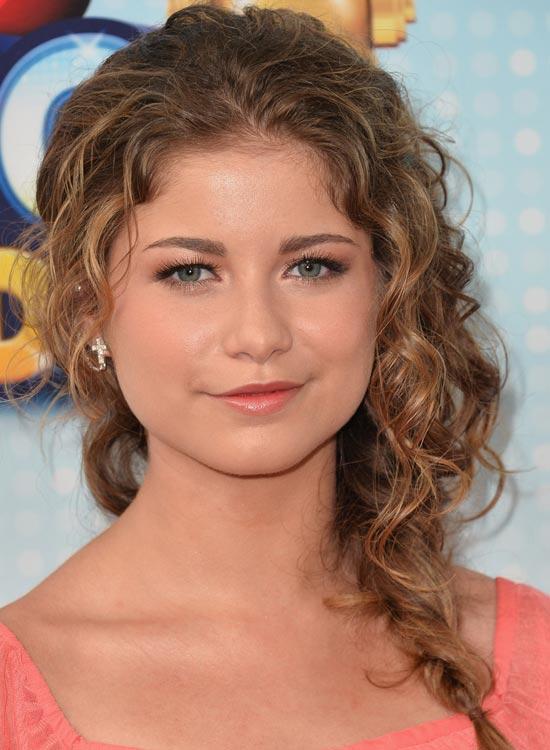
45. Messy Frizzy Plaits
If you have always wanted gorgeous curly tresses, it’s time for you to invest in a diffuser. Trust me, you’ll thank me later. The messy frizzy braid dressed in chaotic and sober flyways is perfect for a first date at a fancy restaurant.
What You Need
- Texturizing spray
- Blow dryer with diffuser attachment
- Hair elastic
How To Style
1. Spritz on some texturizing spray over your washed, wet hair.
2. Bend your head down and flip all your hair over in front of you.
3. With the diffuser attached, blow dry all your hair.
4. Gather all your hair on one side and braid it loosely.
5. Secure the end of your braid with a hair elastic.
6. Pull some curls out of your braid to frame your face and finish off the look.
46. Lean Mini Braid
When you have thick, dark, wavy hair, just a little bit of styling can go a long way. Besides, this look is perfect for people like me who have a prominent forehead. The smart placement of the braid conceals a good portion of your forehead, while still making you look cute.
What You Need
- Texturizing spray
- Hair elastics
- Bobby pins
- Light hold hair spray
How To Style
1. Spritz on texturizing spray over all your hair.
2. Create a deep parting on one side.
3. From the side of your parting with more hair, pick up a 3-inch section of hair from right above your forehead.
4. Braid this section and secure it at the back of your head with some bobby pins.
5. From the side of your parting with less hair, pick up a 2-inch section of hair, twist it twice, and pin it to the back of your head.
6. Flip all of your hair over one shoulder.
7. Finish off with some light hold hair spray to set the style in place.
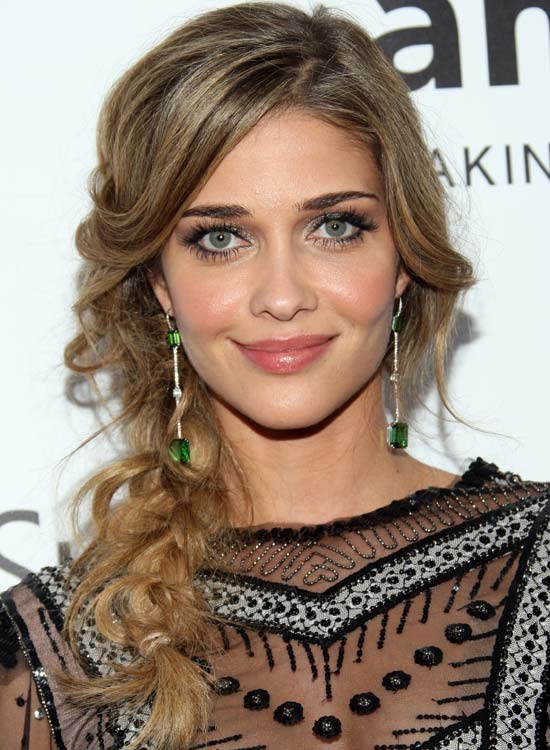
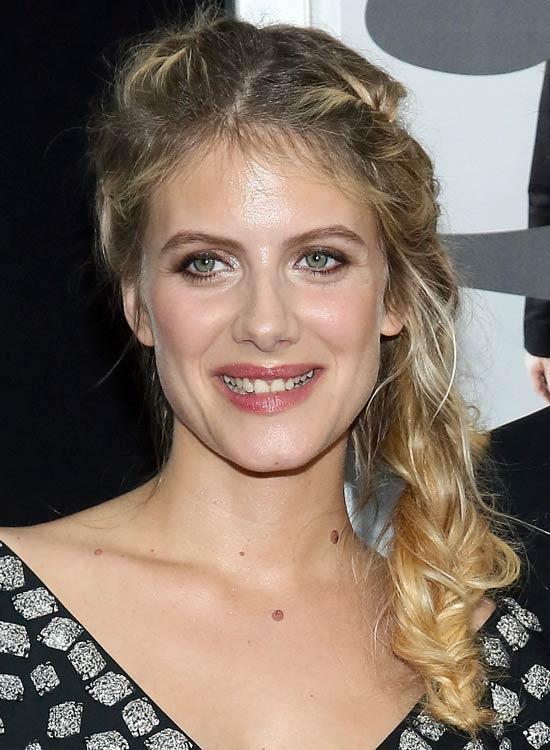
47. Side Braid In Wavy Elegance
The unusual placement of a braid can do wonders in creating new hair looks. Take this look, for example. The little braid starting from your parting and hanging down to frame your face is the epitome of boho chic.
What You Need
- Volumizing mousse
- Smoothening serum
- Hair elastic
How To Style
1. Apply a dollop of volumizing mousse and a dime-sized amount of smoothening serum throughout your hair.
2. Part your hair on one side.
3. From the side of your parting with more hair, pick up a 2-inch section of hair from right above your forehead.
4. Braid this section of hair 5 or 6 times, and secure its tail with a hair elastic.
48. Tender Loose
If you have a date planned out and haven’t washed your hair, don’t worry! This loose braid with loads of volume is just the style you need. The chunky braid with soft wisps of hair falling out gives off some serious romantic vibes.
What You Need
- Texturizing spray
- Volumizing mousse
- Hair elastic
How To Style
1. Prep your hair with some texturizing spray and a dollop of volumizing mousse.
2. Part your hair on one side.
3. Gather all your hair on one side and braid it loosely.
4. Once you’ve secured the end of your braid with a hair elastic, stretch out and loosen your braid from the center to make it wider and give it a more bohemian feel.
5. Pull out a few tendrils of hair from near face to add some softness to your look.
49. Braid Ribboned
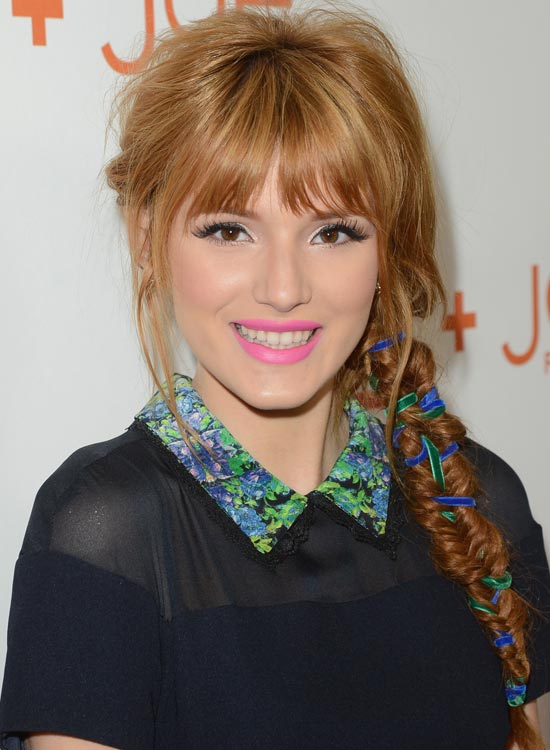
Have a school dance to attend? Add a pop of color to your everyday fishtail braid look by incorporating some colorful ribbon into it. The straight bangs and the colorful braid are perfect to unleash your quirky side.
What You Need
- Texturizing spray
- Hair elastics
- Colorful ribbon
- Light hold hair spray
How To Style
1. Get your hair cut in straight, face framing bangs.
2. Prep your washed, dried hair with some texturizing spray.
3. Leaving out your bangs, tie all your hair into a low side ponytail.
4. Take a ribbon that is twice as long as your hair.
5. Fold the ribbon in half and insert one of its sides into the hair elastic holding your ponytail.
6. Divide your ponytail into parts, with each half of the ribbon in each of the two sections.
7. Start fishtail braiding the ponytail by alternately picking up a thin section of hair from the outer side of one section and adding it to the inner side of the other section. Make sure you braid in the ribbons in the same way you’re braiding in the thin sections of hair.
8. Once you’ve braided all your hair, secure the ends with a hair elastic.
9. Cut off the hair elastic at the top of your braid.
10. Finish off with some light hold spray to set the hairstyle in place.
50. Elegant Half Up
Make the best use of your wavy hair with this graceful look that lets your wavy hair be and simply pulls back your hair to keep all the attention on your face. It’s elegant, it’s pretty, it’s perfect for you.
What You Need
Texturizing spray
Heat protectant serum/spray
1.5-inch curling iron
Bobby pins
How To Style
1. Apply some texturizing spray and heat protectant all over your clean washed hair.
2. Pick up random sections of hair and curl them to give your wavy hair some more definition.
3. Part your hair down the middle.
4. Pick up a 3-inch section from above your left ear, twist it thrice, and pin it at the back of your head.
5. Repeat the previous step on the other side.
6. Pull out some wisps of hair from near your forehead to add some softness to your look.
Say goodbye to that straightening iron, and embrace your hair in all its frizzy, wavy glory! If you have some tips you swear by to manage your frizzy wavy hair, do let us know in the comments section below. Also, do tell us which of the above hairstyles you liked best.
Recommended Articles:
- 50 Ideas For Styling Frizzy Hair
- 10 Simple Homemade Beauty Tips For Hair
- Top Hair Masks Available In India For Dry, Frizzy Hair
- Patanjali Milk Protein Shampoo Review
- 6 Essential Tools To Style And Maintain Your Wavy Hair

